Learn How to Use Google's Webmaster Tools with this Beginner's Guide
Tuesday 27 January 2015, by Lewis Swift

If you want to improve your site's ranking on Google's search results pages, using Google's Webmaster Tools is non-negotiable. But luckily, it's easy to get started.
Google's Webmaster Tools will allow you to:
- Find and fix errors in your site, such as broken links
- Discover which keywords Google is finding in your site (ideally the ones you want to rank for)
- Keep track of the links Google has found pointing to your site from other sites (ideally relevant ones)
- Test your site's speed and improve it if necessary
- Test your Schema markup and fix it if needed
Signing Up for Google's Webmaster Tools
To start using Google's Webmaster Tools, you'll need a Google account. You may already have one from using one of their other services (such as Gmail, Google Drive or Google Apps), but if not you can make your account now. Visit Google.com/Webmasters to watch a short video, and click 'Sign in to Webmaster Tools' when you're ready:

This will take you to the login screen, where you can use an existing Google account to login or you can click the 'Create New Account' link to make an account:
Once you've signed in, you'll need to add your website and verify your ownership of it. Otherwise, Google won't share any data about that website with you.

There are several verification methods available. The recommended method, 'HTML file upload', is the simplest and doesn't involve looking at any code. You simply download the file that Google gives you, and then upload it to your website's server alongside the rest of your website files.
If your site was developed by someone else, they can help you with this—it should only take a few minutes. Alternatively, if you used a website builder, they often provide easy methods for verifying your site with Google's Webmaster Tools. The following links will take you to the instructions for popular website builders: Wix, Squarespace, Moonfruit.
Or, if you have a WordPress website, you can use the Yoast SEO for WordPress plugin to easily verify your site with Webmaster Tools. Follow this guide to install the plugin and configure it. The screenshot below shows the plugin's Dashboard area which allows you to copy & paste in the Google Webmaster Tools verification code:
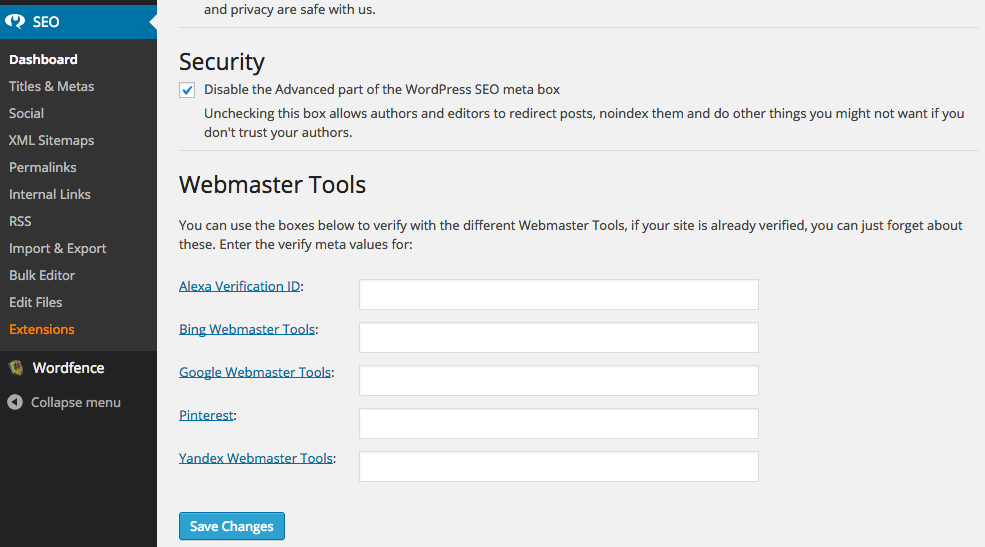
The code that you have to copy & paste in comes from the 'Alternate Methods' of verification offered by Google Webmaster Tools:

Once you've successfully verified your website, you can now select it from the Webmaster Tools home page in order to view its Site Dashboard.
Using Google Webmaster Tools: Submit a Sitemap
There won't be too much to see in the Site Dashboard if you've only just verified your website. It takes Google some time to crawl your site and look at all of the content on each of its pages.
You will need to wait a few hours (or overnight) before much data about your site is collected. However, you can help Google crawl your site by submitting a sitemap, which is simply a list of your site's pages coded in a special XML format that is easy for search engines to understand.
The XML sitemap contains a list of your site's page titles and URLs. For the test website being used for this guide, there are only two pages so the sitemap looks like this:

The quickest and easiest way to create an XML sitemap is to use a sitemap generator tool, like this one, which will give you instructions on how to create your sitemap. Alternatively, if you're using a website builder, check the support documentation there for the easiest way to create a sitemap. Or, if you're using WordPress, the Yoast SEO plugin creates a sitemap for you. It will be located at [yourdomain.com]/sitemap_index.xml.
Once you've added an XML sitemap to your site (or it has been created for you by a plugin), you can add it to your Google Webmaster Tools account by going to Crawl > Sitemaps in the main left-hand menu. There's an 'Add/Test Sitemap' button on this view that allows you to enter the link to your sitemap, as shown in the screencast below.
![A short screencast showing how you add an xml sitemap in Google's Webmaster Tools]()
Once your sitemap has been submitted, you may want to wait a few hours to allow Google to thoroughly crawl your site. In the meantime, there are a couple of other useful things you can do.
Add a Robots.txt File
Google likes each website to have a robots.txt file. Like the XML sitemap file, the robots.txt file contains information for search engines to easily find and understand. And it should sit on your server with your other website files.
If you're using a website builder like Wix, Squarespace or Moonfruit, visit their documentation to see how to generate a robots.txt file for your site. Or, if you're using WordPress, make sure you have the Yoast SEO plugin installed as that will generate a robots.txt file for you. It will be located at [yourdomain.com]/robots.txt.
To check on the status of your robots.txt file (i.e. is it present or missing? What instructions for search engines does it contain?), visit your Site Dashboard in Google's Webmaster Tools and click on Crawl > Robots.txt Tester in the main left-hand menu.
Here, you'll see if a robots.txt file exists, and whether it contains any errors. A simple robots.txt file will look something like this:

This robots.txt file is allowing all search engines to access all pages of the site.
You can check that all of your site's pages are accessible to Google's various search bots by using the small testing form here. Simply enter the link to a page you'd like to check and click 'Test':

Test Your Site's Speed
Google cares a lot about how quickly a website loads, and about how easy it is to use on small devices like tablets and mobile phones. To help us improve our site's load times and overall user experience, Google has release the Page Speed Insights tool.
You can access it through Google's Webmaster Tools, by logging in and selecting the site you want to test. Then choose 'Other Resources' from the main left-hand menu, and select 'Page Speed Insights' from the next list of options.
The video below will walk you through the process of testing your website's homepage load time and user experience score.
Tackling each of the recommended improvements can take some time, so we'll cover that in a separate article to be released soon. You can also start learning about optimising images (and much more) from Google's own support documentation here.
Check Your Schema Markup
Schema markup allows us to help search engines understand the content on our websites. It's a type of code that doesn't affect human website visitors at all, but which tells search engines lots of information.
You can learn more on the Schema.org website. For our example site here, we've added 'LocalBusiness' Schema markup to the About page. If you visit that page, right-click anywhere and select 'View Source', you'll be able to see the Schema markup.
To find out whether Google is seeing and interpreting our Schema markup correctly, we can login to Webmaster Tools and select our site. We can then go to Other Resources in the main left-hand menu, and then select 'Structured Data Testing Tool'.
Using this tool, we can test any page of our website that contains Schema markup. If the markup is incorrect or is missing some tags, we can implement some fixes and then re-test the pages.
The video below shows each step of the testing process.
View Your Content Keywords
This section of Webmaster Tools can take a few days before it contains much information, and it will keep changing over time so check it regularly.
This is where you can get a glimpse of how Google has interpreted your website's content. The keywords that Google thinks you are trying to rank for will be listed first, with the most full 'Significance' bar.

If the highest keywords here are not relevant to your site, you need to have a look at your site to understand why. Every page of your site should be targeting one keyword, and all of the text and images on the page should be highly relevant.
Look at whether you're using heading tags correctly in your HTML, and whether you're making use of certain HTML5 elements and ARIA roles to clearly show which sections of your pages contain the most important content. You want to encourage Google to pay less attention to sidebar or footer content, and more attention to the 'main' content area. This guide offers five suggested ways to use HTML5 elements and ARIA roles.
Check Your Site's Backlinks
A core part of SEO is building up a strong collection of links pointing to your site from other websites. These links should be from relevant sources and they should be earned in a natural way (i.e. not through any black hat link-building tactics which result in large numbers of links from low-quality sources appearing in a very short space of time).

Like much of the data in Webmaster Tools, you won't see much in the 'Links to Your Site' section at first. It takes time for Google to discover links pointing to your site on other websites, and it also takes time for modern, sensible link-building tactics to earn you more links.
So check this section of Webmaster Tools regularly, and make sure to take a close look at any newly-listed links that are coming from a source you don't recognise. Perhaps a great-quality site has linked to one of your blogposts—congratulations, if so! You can get in touch to thank them.
However, if you check out the source of a new link and it seems to be very low-quality (a spammy-looking page, for example, containing lots of links to sites relating to gambling or weight-loss, and/or lots of ads), then you might want to contact them to ask them to remove the link to your site.
If they don't reply, or ask for money for the link removal, then you can use the Disavow tool to tell Google that you don't want the link(s) from their site to be counted in your backlink profile.
Keep an Eye on Impressions & Clicks
Once again, there won't be much data here at first. So keep checking back every few days to see which keywords your website is showing in the search results for ('impressions') and which of those impressions are resulting in visits to your site ('clicks').

Over time, you'll see which keywords your site is ranking for and which of those are drawing you the most traffic. Hopefully they'll be relevant keywords that bring you visitors who are looking for the products or services that you offer.
If not, you'll need to look carefully at why you're ranking for irrelevant keywords. Do you need to change the wording on your pages? Add images and relevant external links? Start blogging on relevant topics? Create cornerstone, evergreen content?
Next Steps
If you get stuck while using Google's Webmaster Tools, or if you can't remember how to use a particular feature, take a look at their support documentation:

The most important thing to keep in mind about Webmaster Tools (and SEO in general) is consistency. If you check Webmaster Tools daily or weekly, you can keep an eye on any problems with your site that might crop up. You can also watch your site's performance in the search rankings improve over time.
It won't happen overnight, but a website that is carefully managed and kept error-free (while regularly having interesting and well-promoted content added to it) will eventually climb up to the top of the search rankings.
