Creating a WordPress Website on Your Local Machine
Tuesday 03 March 2015, by Lewis Swift
CONTENTS
It’s a good idea to set up a WordPress website so that you have a ‘sandbox area’ or ‘safe’ version of your website to experiment with. This is especially true if you're creating custom themes or plugins. But anyone with a WordPress website needs a separate, safe version to test updates on.
On your local Wordpress website, you can:
test Wordpress updates, as well as theme updates and plugin updates, to make sure that they don’t conflict/break anything before you run those updates on your live site
experiment with creating new plugins and themes, or with modifying existing plugins and themes, without having to worry if something doesn’t look/work correctly at first
use the local Wordpress website files and database as backups, knowing that they are 100% safe from hacking attempts - so if your live website suffers from a hacking attempt you can potentially replace its files and database with your local files and database (but please still use a good backup plugin on your live site so that you have a good choice of recent backups to choose from if needed)
In the following sections, you'll find videos and step-by-step instructions for setting up a Wordpress website on your computer, known as a ‘local Wordpress website install’ or a ‘local version’ of your website.
Downloading MAMP
Firstly, we will need to get the software that will allow us to create a server-like environment on our computer (i.e. to create our local server).
MAMP is a simple option with a new Windows version as well as the older Mac version. Use the correct MAMP download link depending on your operating system:
Windows: Download MAMP for Windows
Mac: Download MAMP for Mac
Note: MAMP is free software. There is a paid option, ‘MAMP PRO’, but you are under no obligation to pay to upgrade. Simply avoid opening any files or programs/apps named ‘MAMP PRO’ and only open folders, programs and apps named ‘MAMP’. The London Academy of IT has no affiliation with the makers of this software.
Once you have MAMP downloaded and installed on the computer, it may open up automatically or you might need to find the program/app and double-click to get it running.
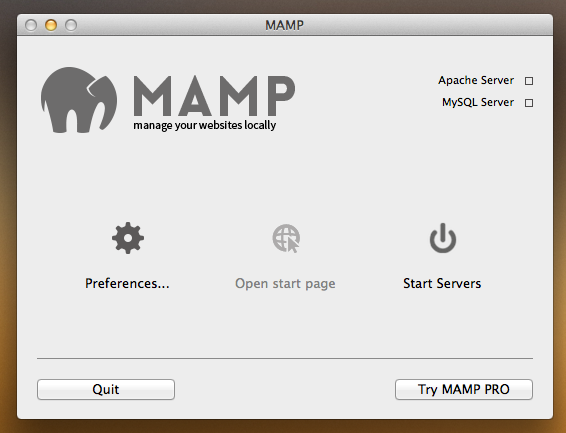
Using MAMP
The MAMP control panel looks like this:
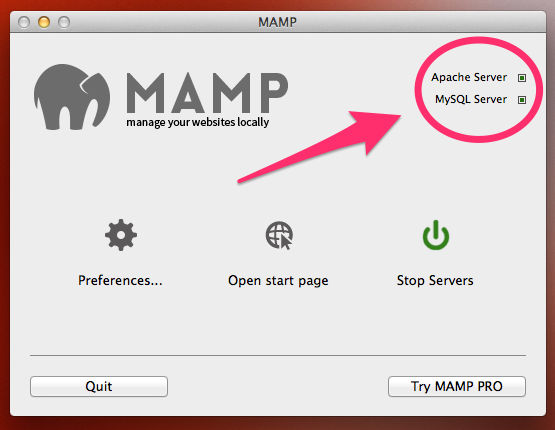
When MAMP starts, it might automatically initialise the Apache Server and MySQL Server processes. It’s worth waiting a moment after you open MAMP to see whether this is happening.
If not, you will need to click on the 'Start Servers' button to get those server processes running.
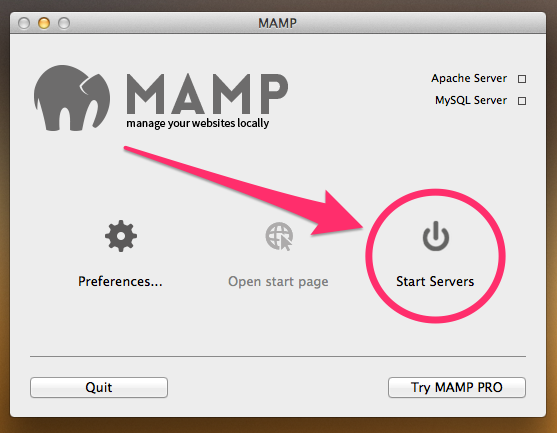
It can take a few minutes for Apache and MySQL to get started. Be patient, and eventually you should see green squares next to the ‘Apache Server’ and ‘MySQL’ server labels in the top-right of the MAMP control panel.
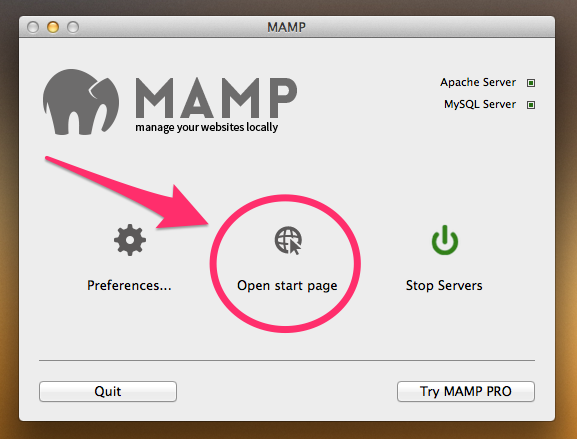
Once Apache and MySQL have been started, it’s also likely that MAMP will automatically open a browser window or a new tab for you and take you straight to the MAMP Start Page.
If not, click on the ‘WebStart’ or 'Open Start Page' icon in the middle of the MAMP control panel to get the Start Page open in a new browser window or tab.
The following screenshot shows you where to find a quick link to the phpMyAdmin tool, which will make it easy for us to create a database for our local Wordpress website to use:
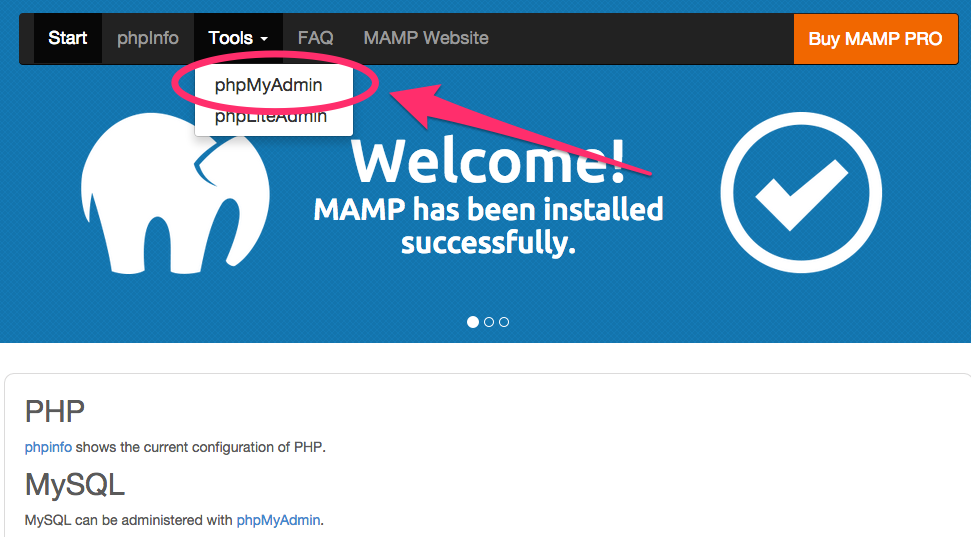
Click on that ‘phpMyAdmin’ link to go through to our local server’s database management area, and click on the ‘Databases’ tab at the top to find the Create New Database form:
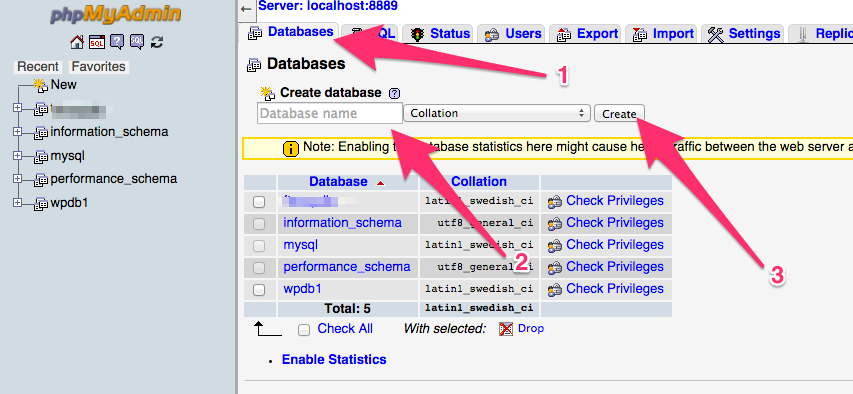
Enter any database name here and then click ‘Create’—remember, the local server is at no risk of hacking, so it’s fine to use a simple database name without any random characters/numbers.
Important note: Any database that you create here on your local server will automatically have a set of login details associated with it. The username will be ‘root’ and the password is either blank or ‘root’.
Downloading the WordPress files
Now that we have created the database ready for our local Wordpress install, we should go and get the Wordpress website files to put into our local server folder.
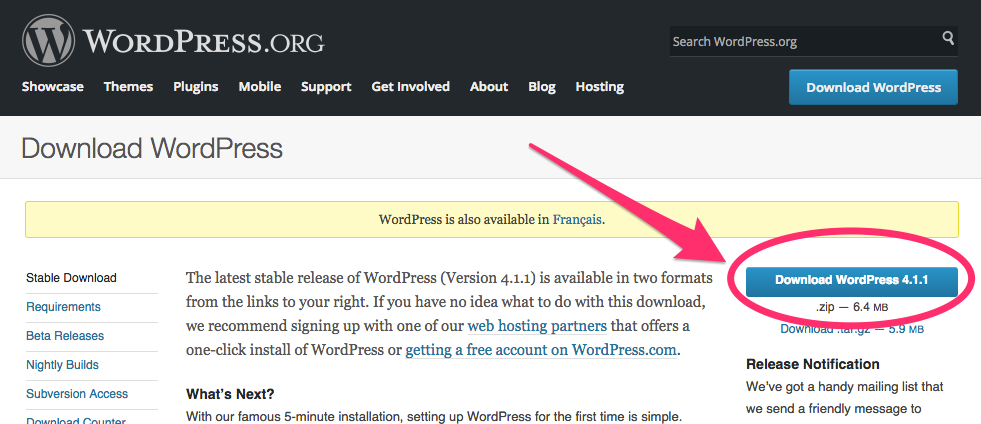
In a new browser tab, navigate to WordPress.org/Download and click on the blue ‘Download Wordpress x.x’ button. 'x.x' refers to the version numbers, showing that we're grabbing the latest version here.
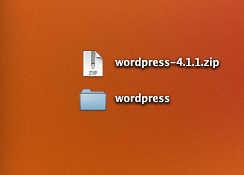
Once the Wordpress file has downloaded (and moved to your Desktop for easy finding, if it isn't here already), you will notice that it is a ‘.zip’ file. This means that its contents are compressed. They must be uncompressed (or ‘unzipped’ or ‘extracted’) in order to be used.
On Windows, right-click on the downloaded, zipped Wordpress file. Look for a menu option like ‘Unzip here’, ‘Extract here’ or ‘Extract files...’, and click on it in order to extract the file. Look for a new folder called 'wordpress' appearing in the same location. This folder contains your WordPress files.
If you are on a Mac, you can simply double-click the zipped WordPress file to extract its contents into a folder with the same name in the same location.
Once you have the inner ‘wordpress’ folder extracted from its container zip file, you can open it up to check that it contains just the WordPress website files:
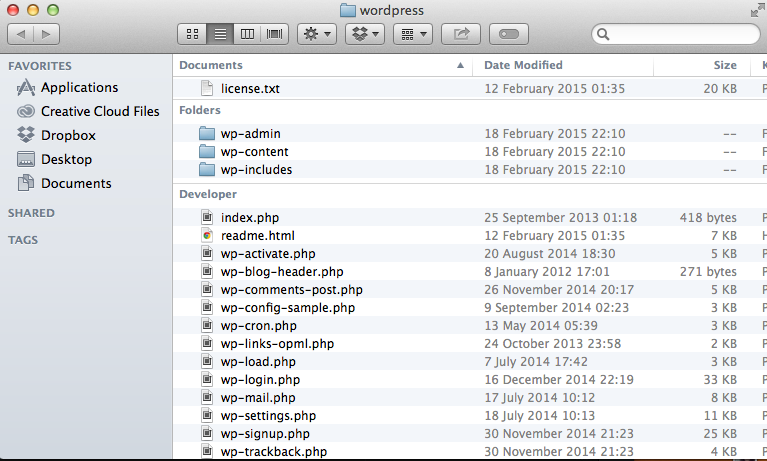
Notice the three folders beginning with 'wp-', and the many other PHP files.
Rename the folder that contains all of these files something like ‘MyWordPressWebsite’. We'll use that name in the following steps so be sure to substitute in your own folder's name if it's different.
Accessing your local WordPress website
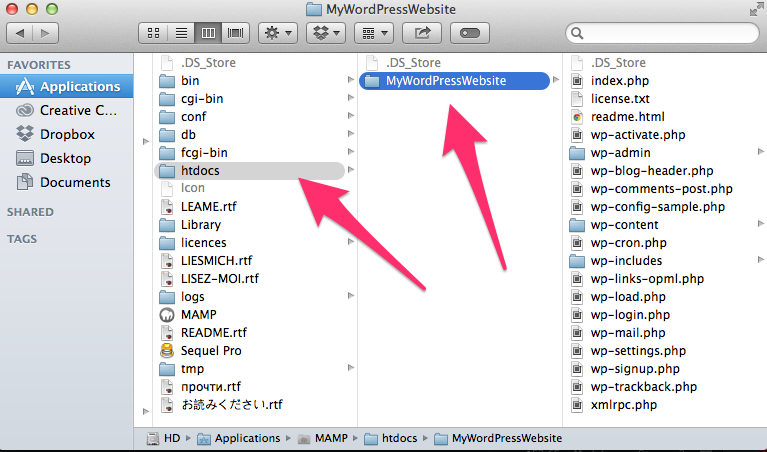
Now we can move that ‘MyWordpressWebsite’ folder into MAMP’s ‘htdocs’ folder in order to make it accessible via a 'localhost' URL in our browser.
To do this, open up a file browsing window (or a Finder window, if you’re on a Mac), and navigate to:
(Windows) C:\mamp\htdocs

(Mac) Applications/MAMP/htdocs
Important note: MAMP might be installed in a different location on your computer, e.g. within Program Files if you are using Windows - that’s fine! Just remember where it is so you can find the ‘htdocs’ folder whenever you need it for running a website locally.
Your ‘htdocs’ folder will probably be empty currently, if this is your first time installing a website on this local server.
Move your ‘MyWordpressWebsite’ folder into your ‘htdocs’ folder:
You can now navigate to your WordPress website through your browser using a localhost URL!
Firstly, make sure that your MAMP program’s control panel is still indicating that both the Apache Server and the MySQL Server processes are running. Are the green squares in the boxes like in the screenshot below?
Next, use the ‘WebStart’ or ‘Open Start Page’ button in the middle of your MAMP control panel to open the MAMP Start Page in a new browser window or tab.
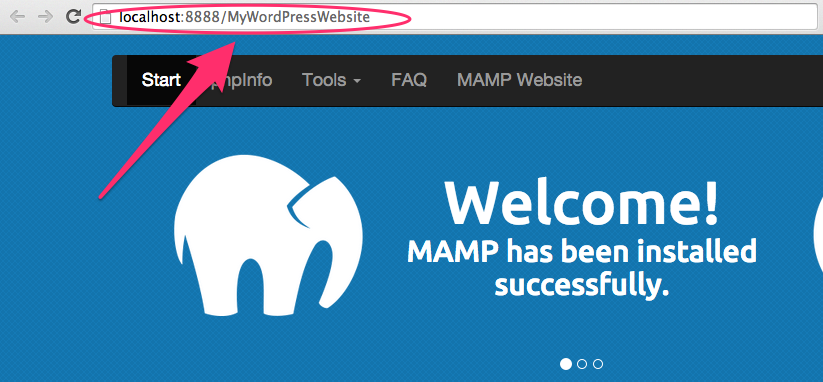
Now look at the address bar of that browser tab, as it should show something like this:
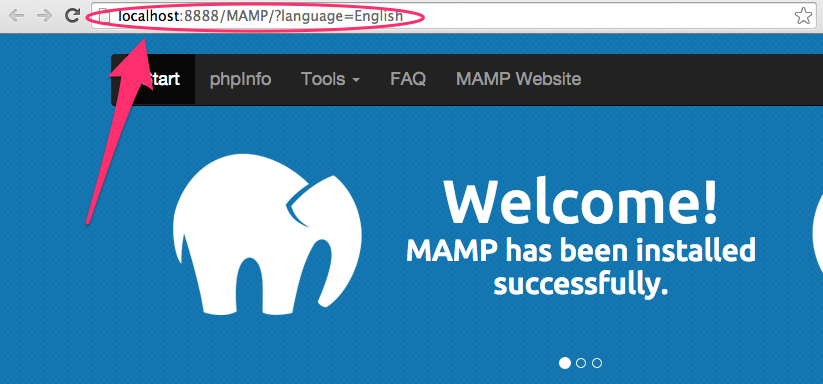
Don’t worry if there are different port numbers there, just make sure to always include them correctly in the URL if you are trying to navigate to your local Wordpress website.
Delete the part of the URL that says ‘MAMP/?language=English’ and replace it with ‘MyWordpressWebsite’ (or whatever you renamed the ‘wordpress’ folder that you put into the 'htdocs' folder just now):
Then press the Enter key on your keyboard to navigate to your local WordPress website.
Because we are setting up this local Wordpress website for the first time, we will be taken to the first step in the setup process. The setup process involves telling our WordPress files about the database it should use.
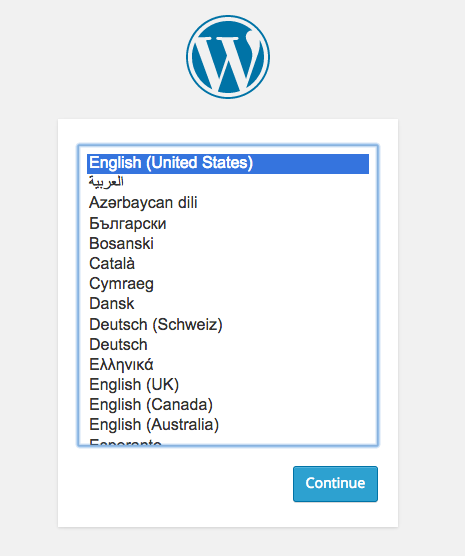
So, first, choose your preferred installation language and click ‘Continue’:
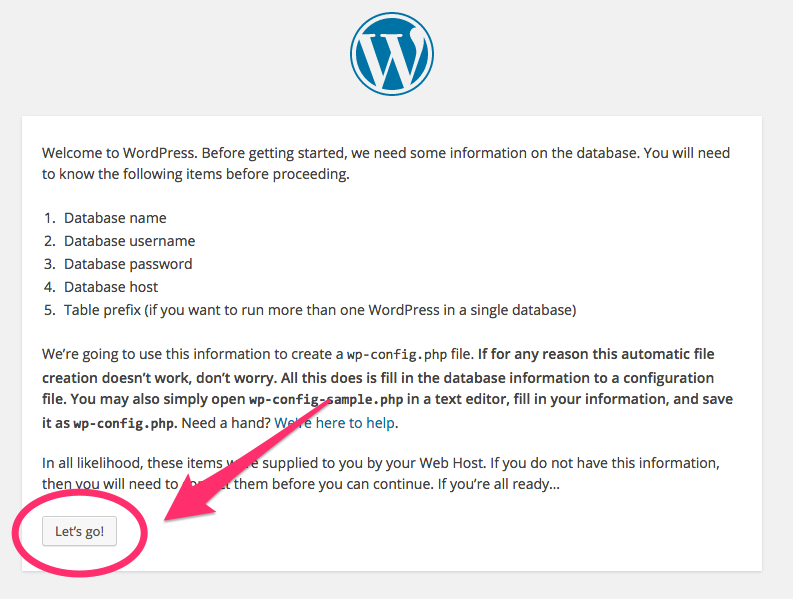
Next, WordPress wants us to provide the information about the database it should be using. It lets us know what it needs, and then we can click ‘Let’s Go’ to enter the information.
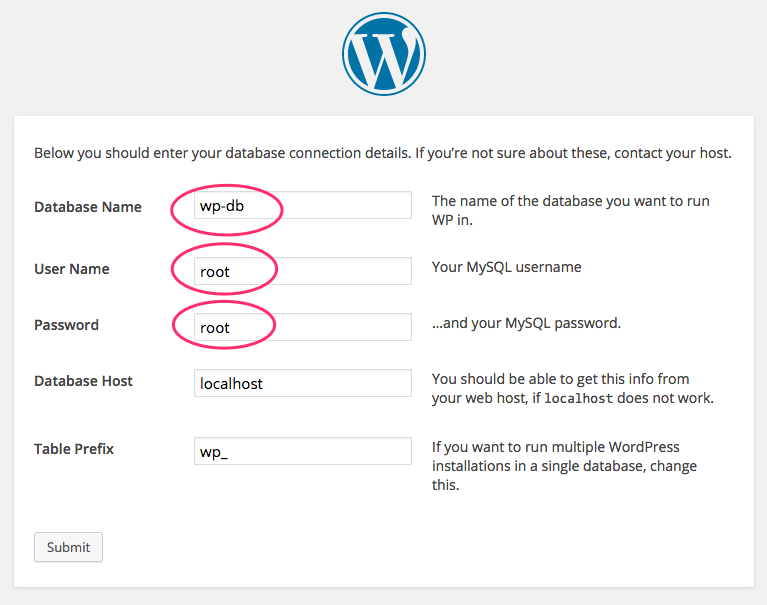
In the next screen, we should enter the database name (in the first field) that we used when we created our database in Steps 10 & 11.
Return to phpMyAdmin via the MAMP Start Page if you need a reminder of the database name you chose.
We should enter a username of ‘root’ and a password of ‘root’, as shown above. Remember, there’s no security needed on our localhost so we don't have to worry about database usernames and passwords here.
Leave Database Host and Table Prefix with their default values, and then click ‘Submit’:
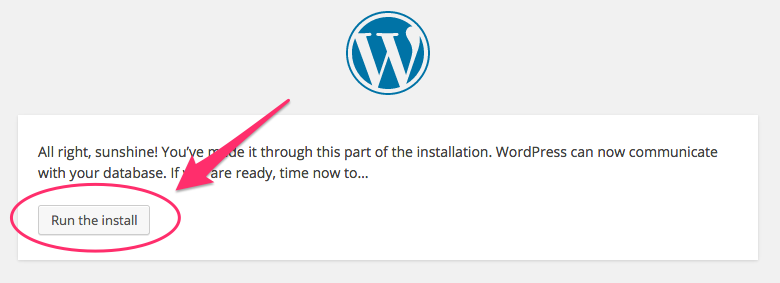
Allow a minute or two for WordPress to connect to the database. It will then show a success message along with a ‘Run the install’ button to move to the next stage:
Completing the setup of your local WordPress website
The next screen welcomes you to the “famous five-minute WordPress installation process” - this is where you can enter a site title and create your local Wordpress website’s admin username, password and email address.
Remember NOT to use ‘admin’ as your username - even though it doesn’t matter on the local server, it WILL matter if/when this site is later uploaded to a live server! It's an easily-guessed username, which is a security risk.
Note: I usually use the same admin username and password here that I plan on using when the site is eventually uploaded to the live server. This keeps things simple.
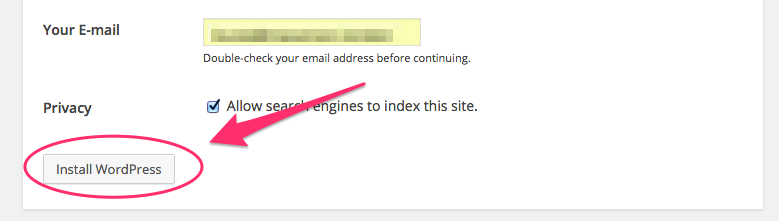
You will probably want to use your real email address here, too, so it’s ready for if/when you upload this local website to your live server. Leave the ‘Allow search engines to index this site’ open checked for the same reasons, if you’ll want your live site eventually indexed by search engines.

Once this form is completed, click the ‘Install WordPress’ button at the bottom to continue:
You’ll be taken to the login view, where you can enter the username and password that you chose just now.
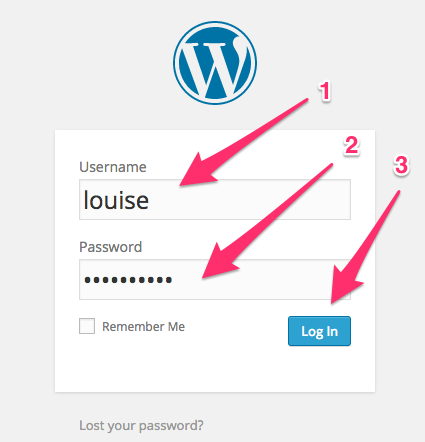
When you enter your login details and click ‘Login’, you’ll be taken to the Dashboard of your new WordPress website on your local server.
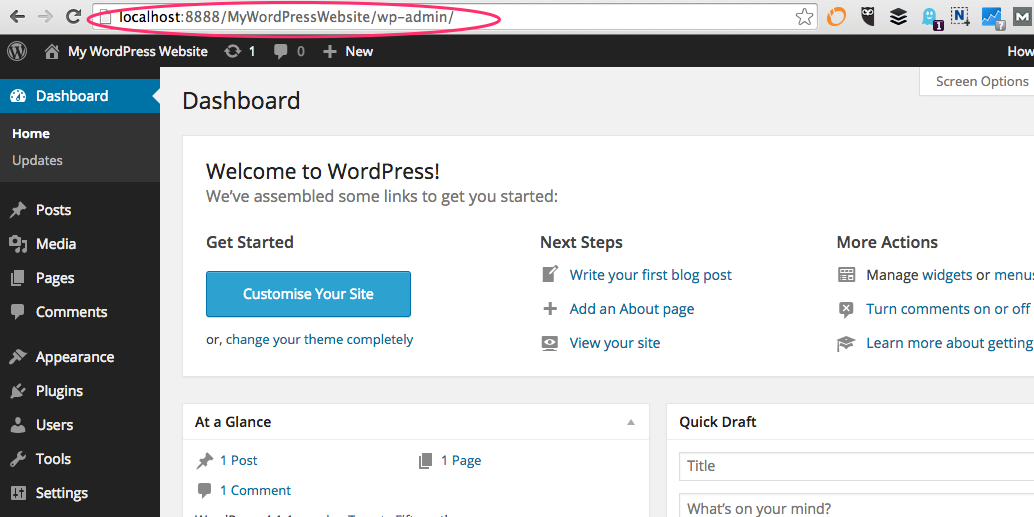
You can see here that, even though it's running locally on your machine, this local WordPress website looks and behaves exactly like a live WordPress website. That's why it's ideal for testing new themes and plugins.
Finished!
Congratulations on setting up a locally-hosted Wordpress website.
You can repeat this process as many times as you like to set up as many locally-hosted Wordpress websites as you need. Make sure to choose a unique folder name in Step 17 and a unique database name in Steps 10 & 11, and to use the correct names throughout the rest of the steps.
This can be a great method of easily and cheaply testing out new website ideas that you have. It's also an essential step for any professional WordPress web development work, as you should never make changes to a client's live website without testing them locally first.
Once you’ve finished developing your Wordpress website locally, you will probably want to copy its content and design over to your live server so that it’s publicly available on the web. We'll be posting an article next week covering exactly how to do that.